Creating, sending, and managing vouchers
What are vouchers?
Vouchers are similar to coupons and can be created by organizations to provide rides or meals for employees, clients, or customers at no cost to them.
There are three types of vouchers that can be created when setting up a voucher campaign:
- Vouchers for rides with Uber
- Vouchers for Uber Eats
- Vouchers for rides and Uber Eats
Who can create vouchers?
Business administrators can create vouchers through the Uber for Business Dashboard. To learn more, see the Self-service vouchers FAQ.
How customers receive vouchers
Customers receive vouchers depending on how it was distributed:
- From Uber: Through text, email, or push notification in the Uber or Uber Eats app
- From an organization: Through email, social media, or other communication channels Vouchers are ready for use after customers have received and claimed them.
How to fix issues redeeming a voucher
- Ensure that the customer has downloaded and updated the Uber app
- Verify the customer is logged into their personal Uber account and has claimed the voucher
- Confirm the trip/order meets the voucher criteria
- If issues persist, advise the customer to contact Uber Support
How to pay for vouchers
You can control who receives vouchers, and your organization is only billed for the ride or meal that is redeemed, not necessarily for the full value of the voucher.
Estimating campaign costs
Use the Cost Estimator when setting up your voucher program to predict your spending. Enter the number of vouchers and their values to see the maximum total budget your campaign might require. Since you’re only billed for redeemed rides or meals, your final cost might be lower than the estimate.

Billing cycle
To set up a voucher campaign, your organization must be on a daily or monthly billing cycle. Your credit card will be charged daily for the total value of vouchers redeemed each day.
Manual Payments
You can make one manual payment per day. If you opt for a manual payment, your account will still be billed at the end of the day for any remaining balance. To make a manual payment:
- Log in at business.uber.com
- Go to Billing
- Select Make Payment under Total Amount Due
- Choose to pay the total balance or a different amount in the pop-up
- Select your payment method from the dropdown and then Submit payment
Setting conditions for the use of vouchers
- Budget restrictions: Determine the per-voucher spend by setting a specific credit amount, a fully covered trip/order, or a certain dollar amount off a trip/order
- Time restrictions: Define specific date ranges or times of day when vouchers can be used
- Geographic restrictions: Restrict voucher usage to specific locations or areas
- User eligibility restrictions: Control which individuals or groups can receive and use vouchers
- Ride type restrictions: Restrict vouchers to certain ride options like UberX or Uber Black
Preventing Voucher Misuse
Setting clear parameters for voucher campaigns is important because your organization is financially responsible for all vouchers that are redeemed, even in the case of misuse. Here are some best practices:
Create individual vouchers: Individual vouchers are designed with specific restrictions in place, allowing redemption by only one user per code. Whereas general vouchers use a single code that can be redeemed by multiple users.
Add restrictions: Restrictions help your organization ensure that vouchers are only used in the way that they were intended. For example, vouchers can be limited to certain geographic locations and specific days of the week or times.
How to create a voucher
To get started, you’ll need to create a Voucher Campaign via the Admin Panel, which can be found in the Business Dashboard at vouchers.uber.com. Only organizations that are set up on daily or monthly billing cycles will be eligible to create voucher campaigns. Once a voucher campaign is active, you won’t be able to make it more restrictive in terms of the value and use cases. Review your voucher parameters before publishing to avoid future issues.
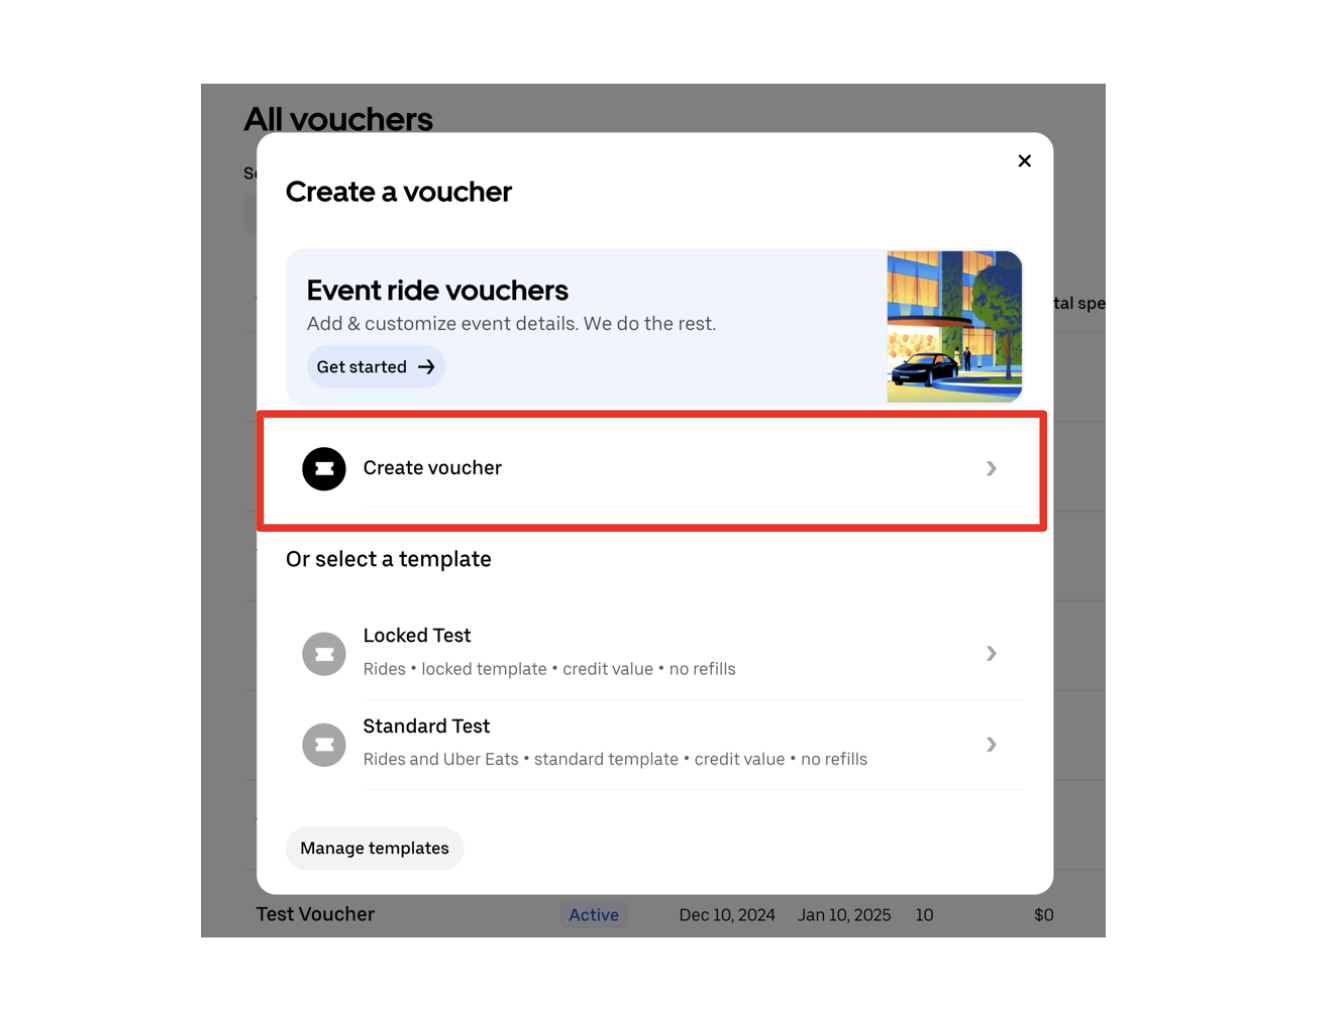
Two ways to create vouchers are:
- Using Templates (standard or locked): This is the recommended and easiest way to create vouchers.
- Manually: If you decide not to use a template, you’ll need to complete each section of the voucher creation prompts.
How to create vouchers using one of the two template types
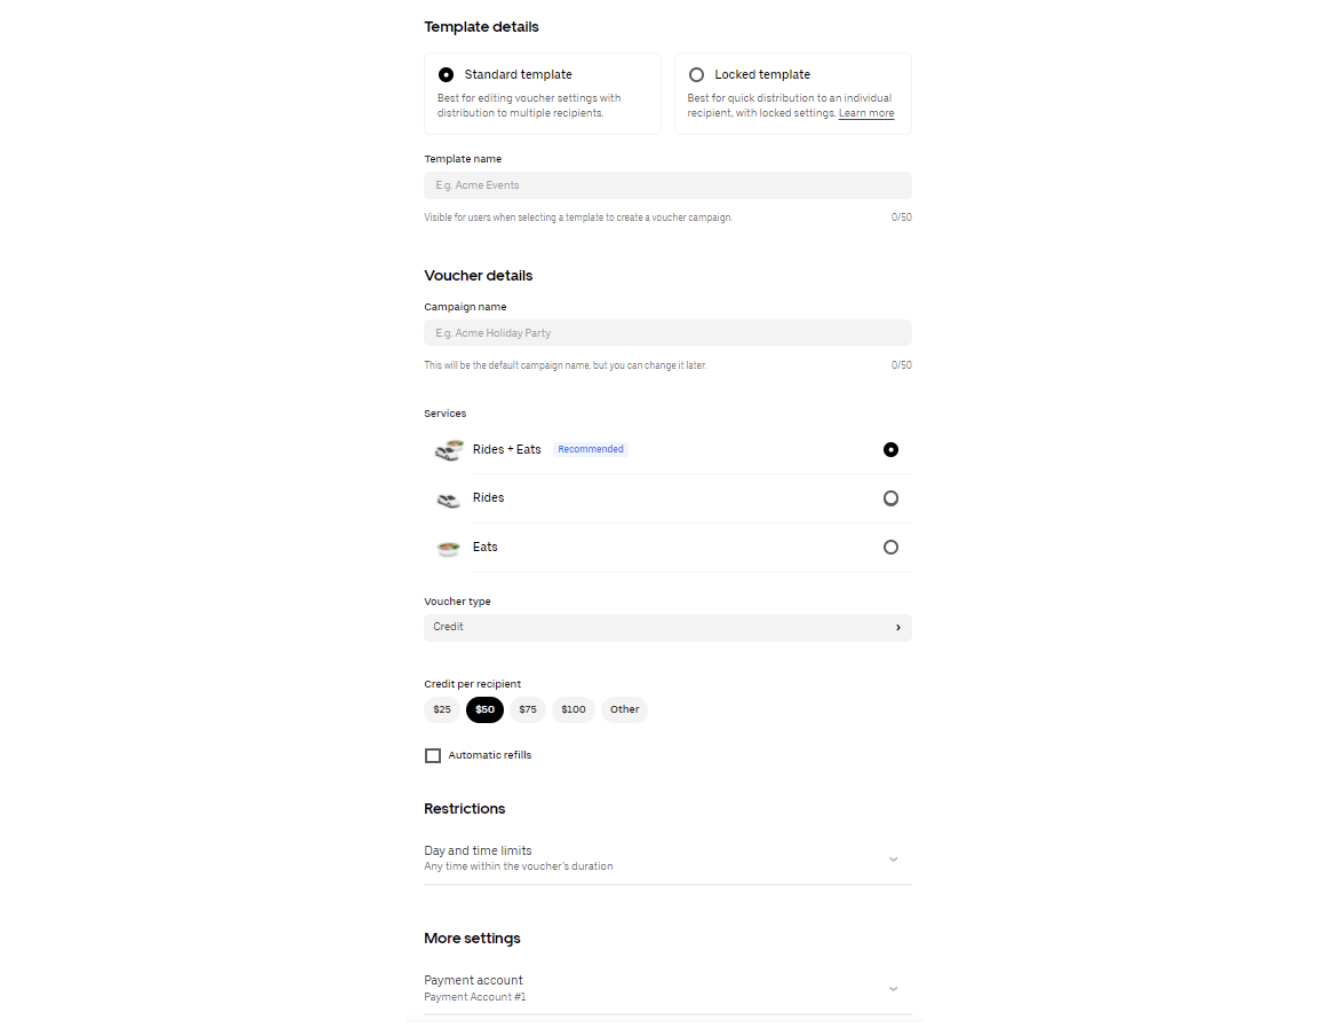
Standard template
Contains fully editable voucher fields and is meant for distribution to multiple recipients.
To set up a standard template for vouchers:
- Sign in to vouchers.uber.com
- From the voucher dashboard, select + New
- Select Standard template
- Set your voucher parameters
- Save your changes
- Begin creating vouchers using this template
To create a voucher using a standard template:
- Select + New in the upper left corner
- Select the desired voucher template
- Customize the editable fields
- Select Get link or Send vouchers to begin distributing
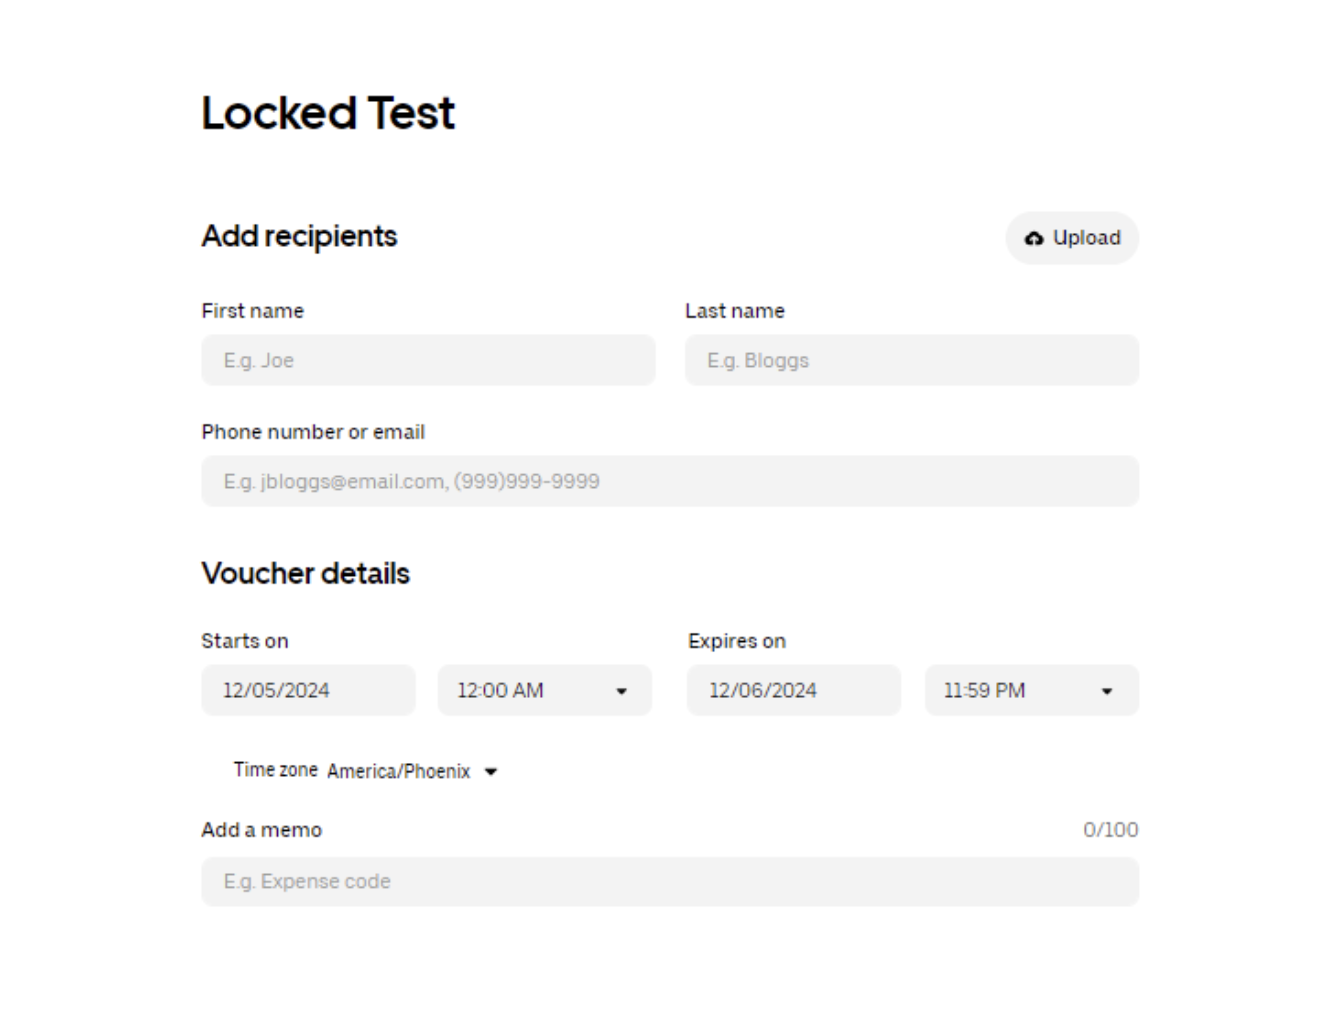
Locked template
Contains voucher fields that can’t be edited and is meant for distribution to a single recipient or a group of recipients.
To set up a locked template for vouchers:
- Sign in to vouchers.uber.com
- From the voucher dashboard, select Create a new template
- Select Locked Template
- Set your voucher parameters
- Save your changes
- Begin creating vouchers using this template
To create a voucher using a locked template:
- Select + New in the upper left corner
- Select the locked voucher template you want to use
- Add the voucher recipients
- Select Send and create another or Send voucher
To create vouchers manually
- Sign in to vouchers.uber.com
- Select + New in the upper left corner
- Select Create voucher
- Enter the voucher name (visible to recipients)
- Enter the voucher details (varies by voucher type) and select Next
- To have Uber distribute the vouchers, input recipient names and their associated phone numbers or email addresses (If you plan to distribute the vouchers yourself, skip this step)
- Select Get link or Send vouchers to begin distribution
How to distribute vouchers
You have two options for distributing vouchers.
Uber sends vouchers for you: Simply provide recipient names along with the phone numbers or email addresses.
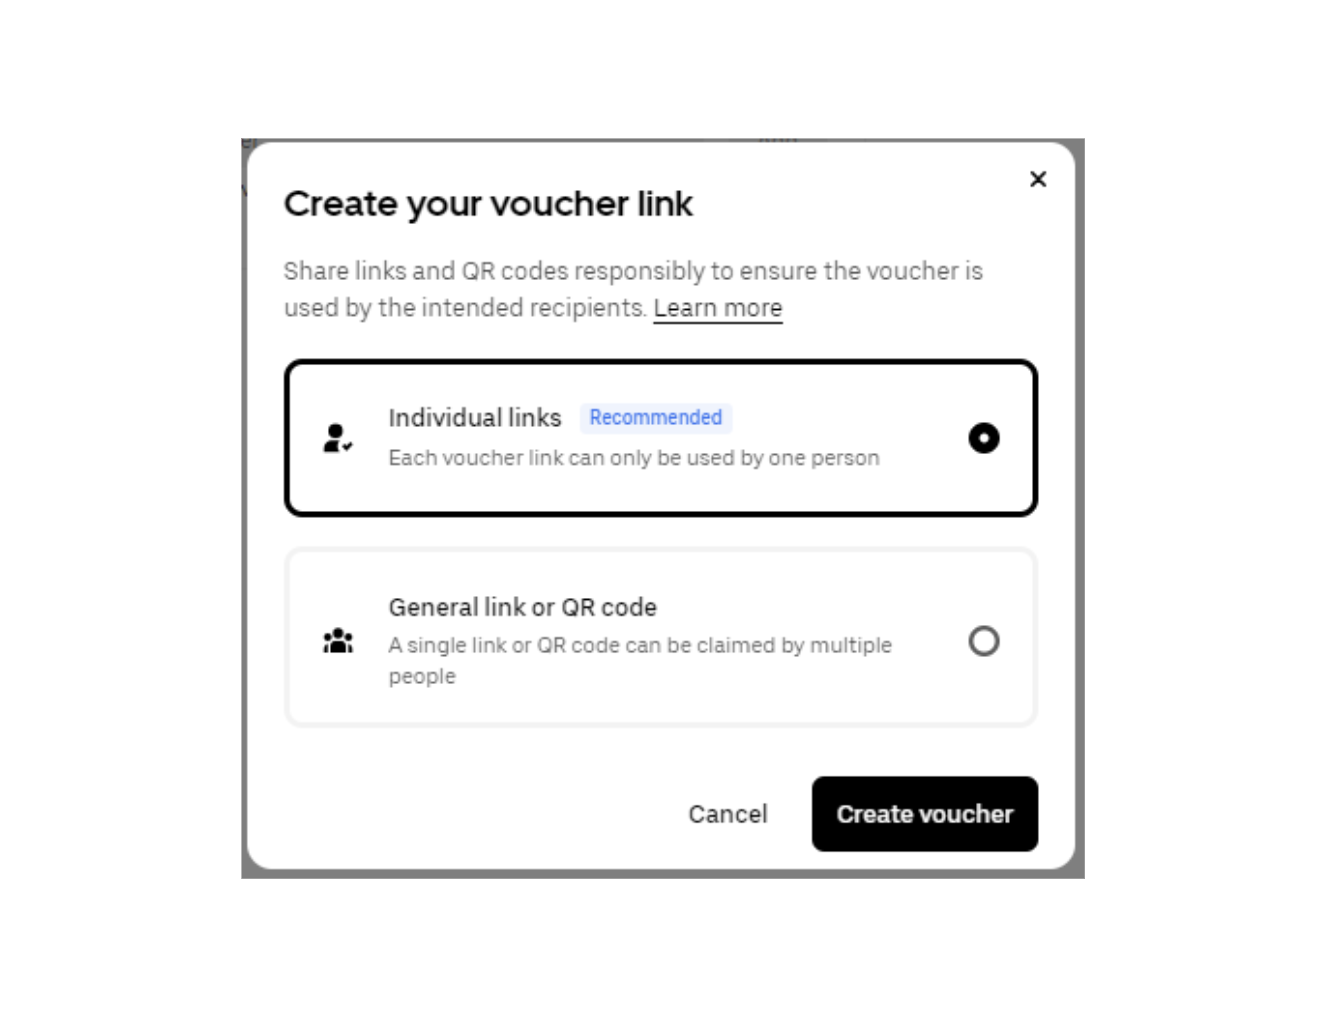
Self-Distribution: Distribute vouchers on your own using links. No recipient contact details are needed for this method. Here are the two ways to distribute:
- Using an individual link: A collection of unique links, each valid for a single ride or order, redeemable by specific recipients, offering your organization more control over who uses your vouchers.
- Using a general voucher link or QR code: A single link that anyone can visit to claim a voucher. Intended for mass distribution via email or social media campaign but not necessarily recommended given that anyone with the URL can claim and redeem these vouchers.
When distributing vouchers yourself, please ensure you follow Uber’s brand guidelines, including proper usage of the Uber wordmark and logo.
How to track voucher redemption
If you are a business administrator and you want to see how many vouchers have been used:
- Log in to vouchers.uber.com
- Select the appropriate voucher campaign
- The total number of redeemed vouchers will be displayed at the top of the program details
Where to find voucher campaign details
If you are a program administrator, you can see all the details of your campaign through the business dashboard by:
- Logging in to your account at vouchers.uber.com
- Find and select the specific voucher campaign you want to review
- Select the three dots to the right of the campaign
- Select Download usage report
How to manage a voucher campaign
Once a voucher campaign is active, you can make it less restrictive, but you won’t be able to change it in terms of valid costs and uses. Be sure to review your voucher parameters before publishing.
You can edit an active voucher campaign to remove restrictions.
To edit a campaign:
- Sign in to vouchers.uber.com
- Go to All vouchers
- Select the voucher program you wish to modify
- Select the three dots in the upper right corner
- Select Edit
- Update the voucher program details as needed (not all sections may be editable once the campaign is active)
- Select Save changes to apply updates (changes should be reflected immediately)
To cancel a campaign:
- Sign in to vouchers.uber.com
- Go to All vouchers
- Select the voucher campaign you wish to cancel
- Select Cancel campaign
- Confirm that you want to cancel
- Select Cancel campaign
- View canceled campaigns under Canceled on the left You’ll still be financially responsible for the total cost of any vouchers that were redeemed before the program was canceled.
To cancel a specific recipient’s voucher:
- Sign in to vouchers.uber.com
- Go to All vouchers
- Select the voucher program you wish to edit
- Select Tracking from the top left of the campaign page
- Select the three dots to the right of the recipient’s name
- Select Remove recipient If the voucher is revoked after being claimed, the recipient will receive a voucher cancellation email.
Retroactively applying vouchers
If the criteria have been met, vouchers can be applied for up to 30 days after a trip or order has been completed. To do this:
- Open the Uber app
- Select Activity
- Choose the trip/order you want to apply the voucher to
- Select Get Ride Help
- Follow the prompts until the voucher has been successfully applied
Still need help with your Uber for Business account or voucher campaign?
For additional support, please check out this video or visit the Uber for Business Help Center.
Use of Uber Vouchers is governed by the Uber for Business General Terms and Conditions and the Uber Vouchers Product Addendum.
Can we help with anything else?